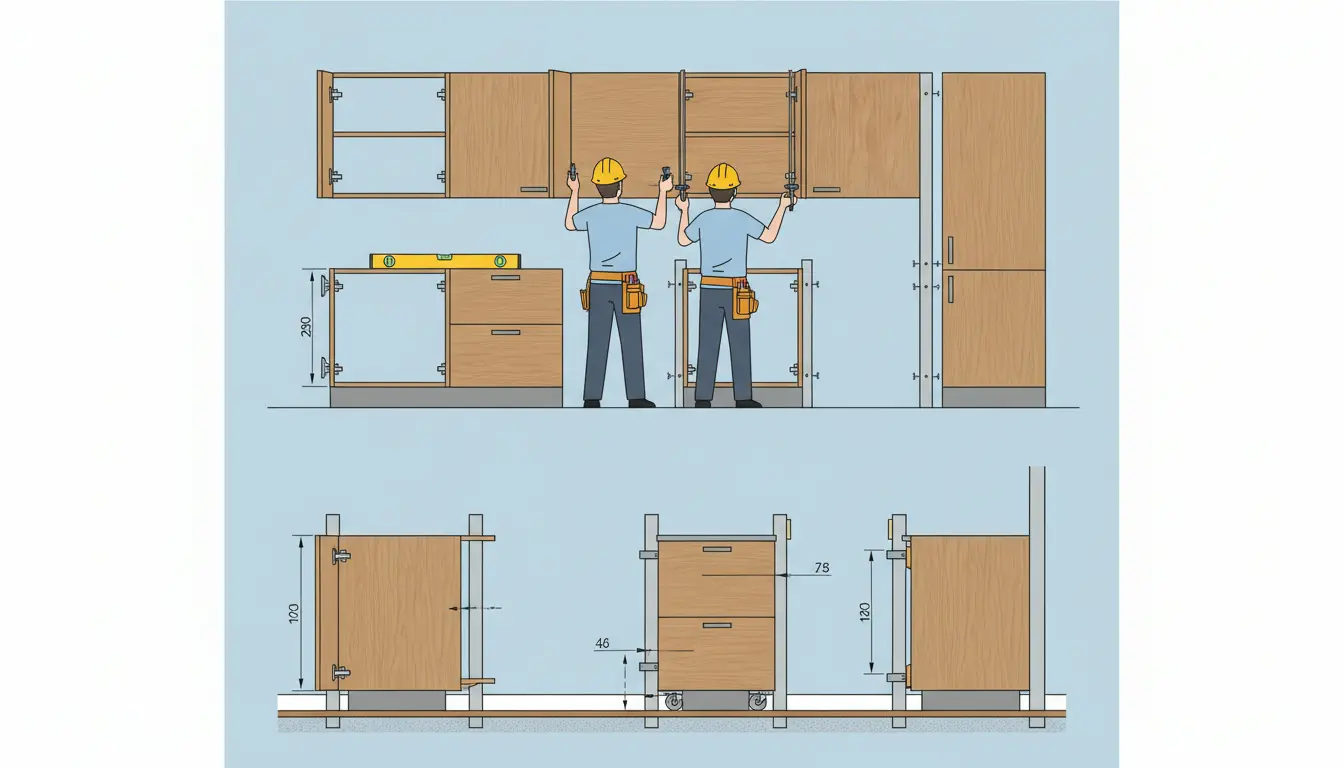
A Kitchen cabinet installation diagram gives you a clear, practical way to plan cabinet placement, leveling, fastening, and finishing before any cabinet is lifted into position. This page helps homeowners, remodelers, and decision makers understand what a reliable diagram should include, how it reduces installation mistakes, and when expert support is worth it. Use it to compare options, prepare your space, and move from uncertain measurements to a kitchen layout that fits, functions, and looks professionally installed.
Why a clear cabinet diagram changes the entire project
Installing kitchen cabinets is not just a matter of placing boxes against a wall. Every cabinet depends on accurate measurements, wall conditions, appliance spacing, countertop overhangs, door swings, drawer clearance, plumbing locations, and the level line that guides the whole run. A well prepared diagram turns those variables into a visual plan you can actually follow.
Without a diagram, small errors multiply quickly. A base cabinet that starts slightly out of level can make the countertop look uneven. A wall cabinet placed without checking stud locations may feel insecure. A pantry unit that ignores door clearance can block a walkway. With a clear layout, these issues can be solved before materials are opened, installers arrive, or costly adjustments become necessary.
For homeowners, the diagram makes the process understandable. For installers, it creates a shared reference. For anyone comparing cabinet quotes, it offers a practical way to see whether the proposed layout has been planned properly. If you are still choosing cabinet styles or configurations, explore kitchen cabinets to connect installation planning with the right product choice.
What an effective installation diagram should show
A useful kitchen cabinet installation diagram should do more than show where cabinets go. It should explain how the kitchen will be installed in real space, including the details that affect strength, alignment, and daily use. The best diagrams combine measurements, elevations, cabinet labels, utility points, and installation notes in one easy to read plan.
Key details to include
-
Wall measurements: Total wall lengths, corner positions, openings, and any irregular areas that affect cabinet placement.
-
Cabinet sequence: The order of base, wall, tall, corner, sink, pantry, and specialty cabinets.
-
Level reference line: A consistent guide line that helps align both base and wall cabinets.
-
Stud locations: Marked fastening points for safe and secure wall cabinet installation.
-
Appliance spaces: Exact openings for the refrigerator, range, dishwasher, extractor, and built in units.
-
Utility connections: Plumbing, electrical, ventilation, and gas locations that must remain accessible.
-
Clearance zones: Door swings, drawer pulls, walkway space, and corner cabinet access.
-
Finishing elements: Fillers, panels, toe kicks, crown moulding, handles, and trim pieces.
When these details are visible, the installation becomes easier to quote, easier to schedule, and easier to inspect. It also helps you spot missing parts before work begins. That can be the difference between a smooth installation day and a stalled project waiting for replacement panels or extra fillers.
Practical scenario: a small kitchen with limited wall space
Imagine a compact kitchen where the sink base sits under a window, the dishwasher must be placed nearby, and the refrigerator occupies the opposite wall. In this situation, the diagram should confirm that cabinet doors can open fully, the dishwasher will not collide with a drawer, and the sink cabinet aligns with existing plumbing. It should also show whether a narrow filler is needed beside the wall to prevent drawers from scraping a handle or trim.
This is where a visual plan becomes more valuable than a product list. A list may say that you have a sink base, drawer unit, wall cabinet, and pantry cabinet. The diagram shows whether they work together in the room. It reveals tight corners, uneven walls, and places where custom sizing may be smarter than forcing standard units into a difficult layout.
Practical scenario: a renovation with uneven floors
In older homes, floors and walls are rarely perfect. A cabinet diagram helps identify the high point of the floor, which is essential for setting the first base cabinet. Starting from the wrong point can create gaps under cabinets, uneven countertop support, and visible misalignment along the toe kick.
A professional installer will typically find the highest floor point, mark a level line around the room, and use that line to position the cabinet run. Your diagram should support that process by showing the intended cabinet heights and any adjustments needed for flooring, appliances, or countertop thickness. For more planning detail, review kitchen cabinet installation dimensions before finalizing your layout.
How the diagram supports better buying decisions
A strong diagram does not only help during installation; it helps before you buy. It lets you compare cabinet packages more accurately because you can see what is included and what may be missing. Two cabinet quotes may look similar at first, but one may include fillers, panels, trim, and hardware while another may only include the main cabinet boxes.
When you evaluate offers, use the diagram to ask specific questions:
-
Are all exposed cabinet sides finished?
-
Are fillers included where cabinets meet walls or tall units?
-
Does the plan allow enough space for appliances to open and ventilate?
-
Are wall cabinets fastened into studs or supported by rails?
-
Will crown moulding or upper trim fit below the ceiling?
-
Is there enough clearance for handles, corner units, and pull out storage?
These questions make your buying process more controlled. Instead of choosing only by style or price, you can choose by fit, completeness, and long term usability.
What makes a professional plan different
A basic drawing can show cabinet placement, but a professional plan considers installation risks before they appear. It accounts for real wall conditions, tolerance, access, services, and finishing details. This is especially important when cabinets are custom made, installed around integrated appliances, or combined with stone countertops.
A professional approach usually includes:
-
Accurate field measurements taken after demolition or surface preparation.
-
Clear installation sequence for base cabinets, wall cabinets, tall units, and panels.
-
Allowance for uneven floors, out of square corners, and bowed walls.
-
Coordination with countertop templating, plumbing, and electrical work.
-
Final checks for alignment, door adjustment, hardware placement, and trim completion.
If your kitchen includes made to measure storage, premium finishes, or unusual layouts, consider reviewing custom kitchen cabinets alongside your installation plan. A custom solution can solve spacing challenges that standard cabinets cannot handle elegantly.
Comparing do it yourself installation and expert installation
Many confident homeowners can install simple base cabinets, especially in a straight run with level floors and accessible walls. However, wall cabinets, tall cabinets, corner cabinets, and integrated appliance panels demand more precision. The diagram helps you decide where your comfort level ends and where expert help may protect the investment.
Do it yourself may work when
-
The layout is simple and the walls are reasonably straight.
-
You have the right tools, including a level, stud finder, clamps, drill, and suitable fasteners.
-
You understand how to shim, align, clamp, and secure cabinets safely.
-
The cabinets are not extremely heavy or difficult to position.
Professional installation is smarter when
-
The kitchen includes tall, heavy, corner, or deep wall cabinets.
-
Floors are uneven or walls are out of square.
-
Countertops require precise support and accurate templating.
-
Appliance integration must be exact.
-
You want a faster, cleaner, warranty friendly result.
The best choice is not always the cheapest one. A poor installation can damage cabinets, delay countertops, and reduce the life of hinges, slides, and doors. A well executed installation protects both the function and the appearance of the kitchen.
Proof that planning builds confidence
Homeowners who use a clear installation diagram often report fewer surprises during fitting. Installers can arrive with better preparation, clients can understand why certain fillers or panels are needed, and suppliers can verify that the right parts have been ordered. The result is less guesswork and a more predictable project.
In renovation projects, the biggest frustration is often not the work itself, but uncertainty. A cabinet diagram reduces that uncertainty. It gives everyone a common visual language. Instead of vague discussions about where a cabinet should go, the team can point to a measurement, reference line, or elevation and make a confident decision.
Use the diagram before you approve the final order
Before signing off on cabinets, review the diagram slowly. Check every appliance opening, every corner, every exposed side, and every place where cabinets meet walls, ceilings, or floors. Ask whether the installer has enough information to complete the job without improvising. If something is unclear on paper, it will likely be unclear on site.
Ready to move from planning to action? Use a detailed diagram to confirm your measurements, refine your cabinet selection, and choose the right installation support. A better plan now creates a cleaner fit, a stronger installation, and a kitchen that feels finished from the first day you use it.
A precise kitchen cabinet installation diagram helps you prevent measurement errors, improve cabinet alignment, compare quotes, and decide whether do it yourself or professional installation is the better route. It connects design, dimensions, utilities, and finishing details into one practical plan. Before you order cabinets or schedule installation, review your diagram carefully and make every detail clear. Start with a confident plan today and build a kitchen that fits beautifully.
Frequently Asked Questions
What should a Kitchen cabinet installation diagram include?
A Kitchen cabinet installation diagram should include wall measurements, cabinet positions, appliance openings, stud locations, plumbing and electrical points, filler locations, and level reference lines. It should also show tall cabinets, wall cabinets, base cabinets, and finishing details so the installer can understand the full layout before work begins.
Can I install cabinets myself using a Kitchen cabinet installation diagram?
Yes, a Kitchen cabinet installation diagram can help with a do it yourself project, especially for a simple straight run of base cabinets. However, wall cabinets, tall units, uneven floors, and appliance integration require careful leveling and secure fastening. If safety or precision is uncertain, professional installation is usually the better choice.
How does a diagram help avoid cabinet installation mistakes?
A diagram helps identify problems before installation starts, such as tight appliance spaces, missing fillers, poor door clearance, and incorrect cabinet sequence. It also supports accurate leveling and fastening. By checking the layout visually, you reduce the chance of gaps, misalignment, delayed countertop fitting, and costly rework.
Do I need exact measurements before ordering cabinets?
Yes, exact measurements are essential before ordering cabinets. Even a small error can affect appliance openings, countertop fit, drawer movement, and cabinet alignment. Measure walls, corners, ceiling height, windows, doors, plumbing, and electrical points carefully. For renovations, final measurements are often best taken after old cabinets are removed.
Is a Kitchen cabinet installation diagram useful for professional installers?
Absolutely. A Kitchen cabinet installation diagram gives professional installers a clear reference for layout, sequence, cabinet sizes, utilities, and finishing details. It helps them prepare tools, verify parts, communicate issues, and install more efficiently. A clear diagram also helps homeowners understand what is being installed and why certain adjustments are needed.
About the Author